

VS Code Extension Developer Guide
This guide will explain how you configure the webOS TV extension on VS Code and what are the interfaces and commands you can use for app development.
Configuration
There are some preparatory steps for configuration before you start using the webOS TV extension.
Set webOS TV extension
Set the following items at File > Preferences > Settings (Ctrl+ , ) on VS Code. You can see the following items on the Extensions > webOS TV category.
webostv.chromeExecutable
Set the location of the Chrome browser executable to debug apps on webOS TV with Web Inspector, as in the following example.
"C:webOS_TV_SDKIDEchromiumchrome.exe"webostv.defaultDevice
Set the default device name to skip selecting a device whenever you run a command, as in the following example. This setting is optional.
"emulator"webostv.hostIP
Set the host IP address to skip entering a host IP address whenever you run the webOS TV: Run without Installation command, as ub the following example. This setting is optional.
"192.168.0.1"Connect a target device
To run or debug apps on a webOS TV device, you should connect the device to your PC. This is not necessary for the emulator.
Step 1. Install the Developer Mode app
First, install the Developer Mode app on your TV and turn on Developer Mode. For more information about installing the Developer Mode app and preparing the login account, see Developer Mode App.
- Install the Developer Mode app on your TV from LG Content Store.
- Launch the Developer Mode app from the webOS TV Launcher and log in to the Developer Mode with your LG account.
- Click the Dev Mode Status button to turn on Developer Mode.
Step 2. Register the target device
Register your target device information on VS Code.
- Select webOS TV: Set Up Device from the Command Palette (Ctrl+Shift+P) and select Add Device. You can also click the Add Device icon (+) on the webOS TV Devices in the Activity Bar.
- Enter your device name.
- Enter your device's IP address.
- Enter your device's port number for the connection. In most situations, press Enter to set it as the default value (
22). - Enter the device's username for connection. In most situations, press Enter to set it as the default value (
root).
Step 3. Set the SSH key
- After turning on Developer Mode on your device, launch the Developer Mode app.
- Click the Key Server button in the Developer Mode app.
- Select webOS TV: Set Up SSH Key from the Command Palette (Ctrl+Shift+P) on VS Code and select your device. You can also right-click on the device and select Set Up SSH Key on the webOS TV Devices in the Activity Bar.
- Enter the passphrase (case sensitive) as displayed on the Developer Mode app.
App development
This section guides you on developing apps using the webOS TV extension on VS Code. Read this section after completing Configuration.
Create a web app
To create a web app in VS Code, generate a project first, then write your code.
Start by creating a web app from one of the available templates. These templates provide a starting point for developing web apps.
- Select webOS TV: Generate Project from the Command Palette (Ctrl+Shift+P).
- Select Basic Web App.
- Select a location for your app with the file system button at the top-right corner of the Command Palette. You can press Enter to create a basic web app in the default path (your current workspace directory).
- Enter the project name of your app.
- Enter your app properties - app ID, app version, and app title. You can press Enter to set them to default values.
- Select whether to open the created app directory as the workspace.
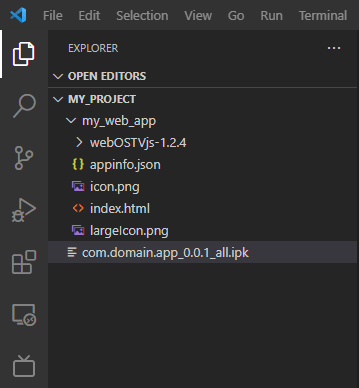
The following image is an example of the my_web_app project under the MY_PROJECT folder created from the basic web app template.
It did not open the my_web_app project as the workspace by selecting No in the last step.

Deploy the web app
Before you deploy your web app on the target device, make sure to connect the target device to your PC. For more information about the connection, see Connect a target device .
Package the web app
Package your project, created in the previous section, into an app package (IPK) file.
- Select webOS TV: Package Application from the Command Palette (Ctrl+Shift+P).
- Enter the directory of your web app. You can press Enter to set it to the default path (your current workspace directory). To package a web app with JS services, click Browser File System on the top-right corner and select the directories of the web app and JS services to package together using the ctrl key.
- Enter the directory path to locate the app package file. You can press Enter to set it to the default path (your current workspace directory).
- Select whether to minify your app. To debug with the web inspector, select No.
If your app is packaged successfully, the IPK file is created as below.
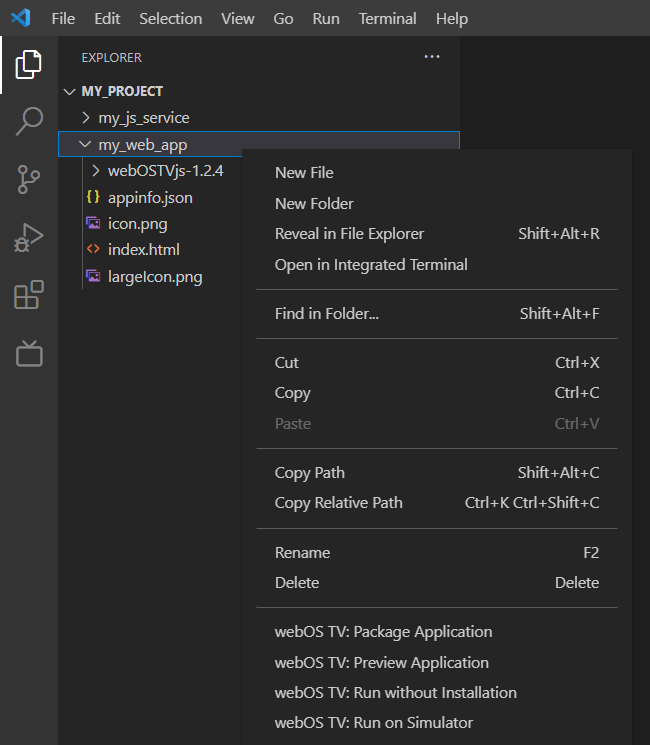
You can also package the project with the Explorer context menu.
Install the web app
Install the app package file on the target device.
- Right-click the IPK file from the Explorer.
- Select the device to install the app.
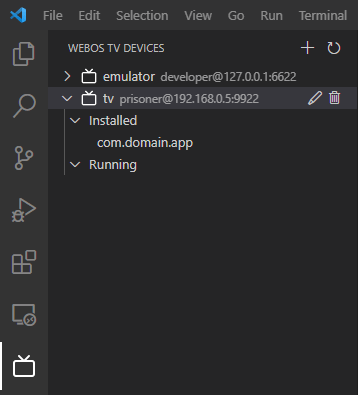
If your app is installed on the target device successfully, you can see the app on the webOS TV Devices view below.
You can also install your app with the webOS TV: Install Application command on the Command Palette or the Device context menu.
Launch the web app
Launch the app installed on the target device.
- Right-click your app ID to launch from the installed apps list.
- Select Run.

You can also launch your app with the webOS TV: Launch Application command on the Command Palette.
Launch the app with parameters
You can launch the app installed on the target device with launch parameters.
-
Select webOS TV: Launch Application with Parameters from the Command Palette (Ctrl+Shift+P).
-
Select the device to launch the app.
-
Select the app ID to launch.
-
Enter launch parameters. If you do not enter the parameters and press Enter, the content in the .launchparams.json file in the root of the workspace will be entered by default. If you enter the parameters, they will be save in the .launchparams.json file.
The following is an example of the parameter input window when the content in the .launchparams.json file is {"key":"test 123"}. If you do not enter the parameters and presses Enter, {"key":"test 123"} will be entered by default.

Launch the app on the Simulator
You can run your app on the Simulator without packaging and installing it.
If you have not installed webOS TV Simulator yet, go to Simulator Installation and install the Simulator first.
- Right-click the app directory from the explorer and select Run on Simulator.
- Select the version of webOS TV Simulator to launch.
You can also execute the webOS TV: Run on Simulator command on the Command Palette.
You can launch an app with parameters on the Simulator using the webOS TV: Run on Simulator with Parameters command on the Command Palette in the same way explained in Launch the app with parameters.
Debug the web app
Before debugging your app, make sure to set the value of webostv.chromeExecutable property in Settings.
For more information about the setting, see Set webOS TV Extension.
Inspect the web app
Run Web Inspector and open the browser. Web Inspector displays the running information about your app.
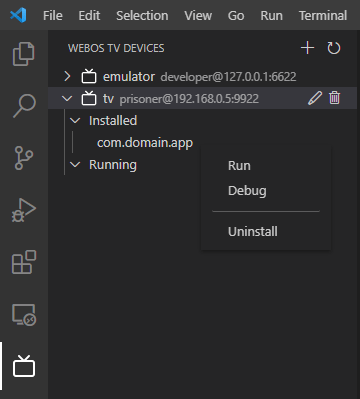
- Right-click the app ID to debug from the installed or running apps list.
- Select Debug.
- Chrome browser for Web Inspector is launched with the debugging URL.
You can also launch your app with the webOS TV: Inspect Application command on the Command Palette.
Inspect the JS service
Run Node Inspector in the device and create a launch configuration file to run Node Inspector Client in the VS Code. The JS service to inspect should be packaged and installed with the app in the device.
-
Select webOS TV: Inspect JS Service from the Command Palette (Ctrl+Shift+P).
-
Select the device.
-
Enter the service ID to inspect.
-
For webOS TV 5.0 or higher, a launch configuration file(.vscode/launch.json) is created in the workspace. If there is no opened workspace, select the location of the launch configuration file with the file system button at the top-right corner. To start debugging, press F5.
For webOS TV 4.5 or lower, Chrome browser for Node Inspector is launched with the debugging URL.
The following is an example of debugging com.domain.app.service on webOS TV 22.

Run the app without installation
You can run your app on the target device without packaging and installing it whenever you change the code.

- Right-click the app directory from the explorer and select webOS TV: Run without Installation.
- Select the target device to run the app.
- Enter the IP address of the host PC (your local PC).
You can also execute the webOS TV: Run without Installation command on the Command Palette.
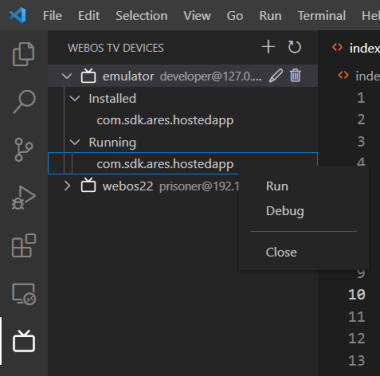
To close the hosted app on the target device, follow the steps.
- Right-click com.sdk.ares.hostedapp from the running apps list.
- Select Close.
Interfaces and commands
The webOS TV extension for VS Code provides most features of the webOS TV CLI, so with its commands and menus, you will have the same result as the webOS TV CLI. If you want to check available features in the extension, see Supported features.
Command Palette
To see all available webOS TV commands, open the Command Palette (Ctrl+Shift+P) and type webOS TV.

Develop apps
To develop apps, use the following commands.
- webOS TV: Generate Project: Create a web app from templates.
- webOS TV: Preview Application: Runs a web server for testing app files in local PC.
- webOS TV: Package Application: Package your app files into the package file (.ipk) stored in a specified directory.
Connect devices
To connecting the target devices and your PC to test your app excepting the emulator, use the following commands.
- webOS TV: Set Up Device: Add, modify, or remove devices from the device list.
- webOS TV: Set Up SSH Key: Get a private key from webOS TV device. After getting the private key, you can install and launch apps or run other commands on webOS TV.
Test apps on devices
To test apps on the target devices, use the following commands.
- webOS TV: Install Application: Install your app on the target device with the selected app package file (.IPK).
- webOS TV: Launch Application: Run your app installed on the device.
- webOS TV: Inspect Application: Run Web Inspector and open the browser. Web Inspector displays the running information about your app.
- webOS TV: Inspect JS Service: Run Node Inspector in the target device and create a launch configuration file to run Node Inspector Client in VS Code. You should package the JS service with your app by CLI and install it on the target device.
- webOS TV: Run without Installation: Run your web app on the device without packaging and installing the app whenever you change the code.
Batch commands
To execute multiple commands at a time, use the following commands.
- webOS TV: Run Application: Package, install, and launch your app sequentially.
- webOS TV: Debug Application: Package, install, and inspect your app sequentially.
Explorer
On the Explorer, you can browse, open, and manage all of the files and folders in your webOS TV project.
Explorer Context Menu
When you right-click the IPK file of your app on the Explorer, you can install, run, and debug your app.
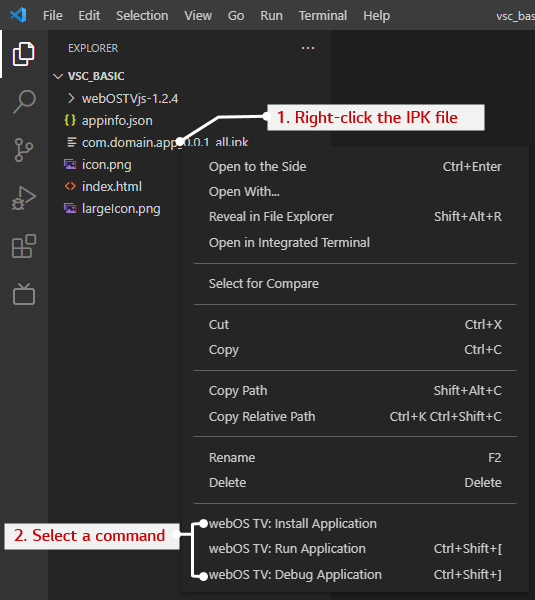
- webOS TV: Install Application: Install the selected app.
- webOS TV: Run Application: Install and launch the selected app.
- webOS TV: Debug Application: Install and inspect the selected app on the target device.
When you right-click the directory of your app files on the Explorer, you can also package, preview, and run without installing your app.

- webOS TV: Package Application: Package the selected app directory into the package file (.ipk) stored in a specified directory.
- webOS TV: Preview Application: Run a web server for testing the selected app directory.
- webOS TV: Run without Installation: Run the selected app directory on the device without packaging and installing the app whenever you change the code.
Editor
You can run some commands directly by right-clicking in the editor without launching the Command Palette.
Editor Context Menu
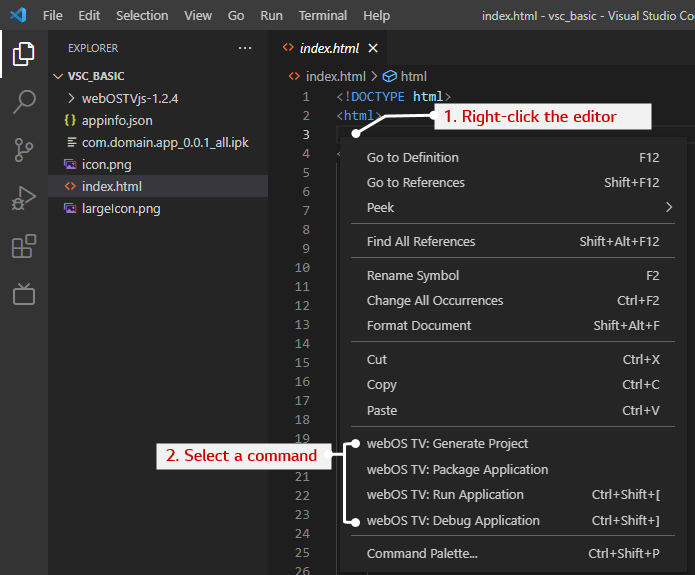
- webOS TV: Generate Project
- webOS TV: Package Application
- webOS TV: Run Application
- webOS TV: Debug Application
Activity Bar
You can run some commands about target devices and your apps from webOS TV devices in the Activity Bar. To activate the extension, click the Refresh icon at first.
Device Inline Menu

- Refresh: Refresh the list of devices.
- Add Device: Add a device to the list.
- Modify Device: Modify the selected device.
- Remove Device: Remove the selected device.
Device Context Menu
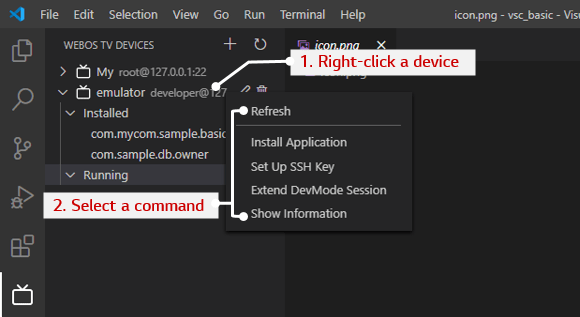
- Refresh: Refresh the installed and running app lists of the selected device.
- Install Application: Install your app to the selected device.
- Set Up SSH Key: Get a privacy key from the selected device.
- Extend DevMode Session: Extends the Developer Mode session time of the selected device. Note that this command only works when the following conditions are satisfied.
- The Developer Mode is on.
- The session time remains longer than 0 minutes.
- Show Information: Retrieves the following system information of the selected device. Note that if some system information cannot be retrieved depending on TV models, only the retrieved information is displayed.
- Model Name
- SDK Version
- Firmware Version
- Board Type
- OTA (Over The Air) ID
Application Context Menu

Note that you can refresh the installed and running app lists only when the device is connected.
- Run: Run the selected app to the device. It is the same as webOS TV: Launch Application command in the Command Palette.
- Debug: Run Web Inspector and open the browser. Web Inspector displays the running information about your app. It is the same as webOS TV: Inspect Application command in the Command Palette.
- Uninstall: Uninstall the selected app from the device. This command works only for installed apps.
- Close: Close the selected app on the devices. This command works only for running apps.