Beanviser Developer Guide
Getting started
Here is a brief outline of tasks involved in measuring your app performance with Beanviser.

1. Setting up
No installation is required; simply unpackage the downloaded file in the desired location. For download instructions, see Beanviser Installation.
2. Launching Beanviser
To measure app performance, launch Beanviser. Feel free to launch Beanviser before this stage; we have put this step here merely to make the order seem natural.
| Operating System | How to launch |
|---|---|
| Linux |
|
| macOS |
|
| Windows | On windows, you can use a file explorer or command prompt. Using file explorer:
|
3. Connecting Beanviser to target
To measure app performance, launch Beanviser and connect Beanviser to your target. See Connecting to Target Device for more information.
4. Measuring app performance
Now, you are ready to measure your app performance. Click the START button on the relevant tab.
Connecting to target device
To use Beanviser on a target device, you must first add the target device on Beanviser and then connect to that device as follows:
-
Launch Beanviser.
-
Click the Configuration button (...) to get a list of available devices.
 Note
NoteAs the emulator is a basic device for testing, Beanviser has the emulator in its device list by default. In case you accidentally delete the emulator from the list, follow the steps given below to add the emulator again.
NoteIf you already have the targets added by using IDE or ares-setup-device, Beanviser will show you the added targets automatically.
-
Click the + button and provide the following details of the target device:
- Name - Enter a name for the device. Choose a name that can easily identify the device.
- Host
- TV device: IP address of the TV device.
- Emulator: 127.0.0.1
- Port
- TV device: 9922
- Emulator: 6622
-
Username
- TV device: prisoner
- Emulator: developer
NoteYou do not need to enter the Password and PrivateKey. When you use real TV, enable the Developer Mode before connecting the target.
-
To connect to a target device, select it from the device list and click the Connect button.

-
You can now measure the performance of your app. Click the START button on the relevant tab.
Understanding Beanviser user interface
Beanviser provides multiple tabs (marked as Ⓑ in below image) where each tab provides the visualization of specific Beanviser functionality. Learn what features Beanviser provides through the user interface.
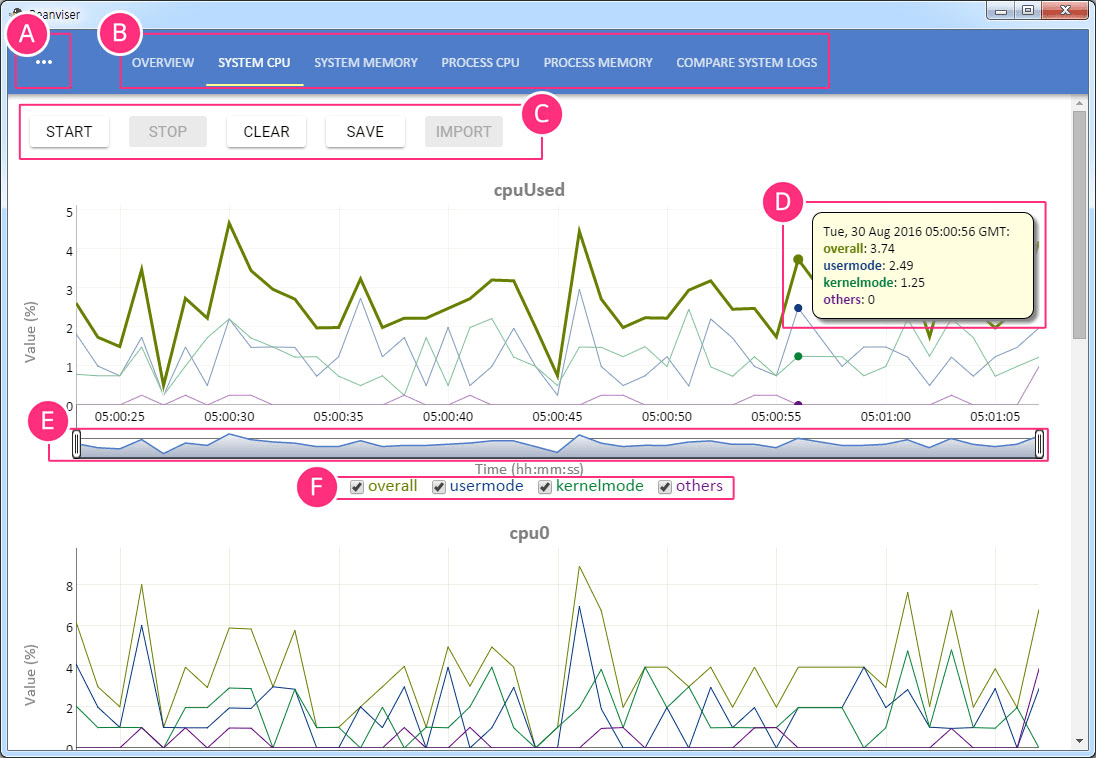
Control buttons
These buttons are provided on all the tabs except the Compare System Logs tab. These buttons provide functions related to performance measuring.

- START - Starts measuring the target performance metric. This button is enabled only when Beanviser is connected to a target.
- STOP - Pauses or temporarily stops measuring. This button is enabled only when measuring has started.
- CLEAR - Clears existing visualization charts from the tab. This option is enabled only when measuring is stopped and if there is a chart to be cleared.
- SAVE - Saves the measurement data on your computer. To save the data, you must first STOP measuring. The data is saved in the '[Beanviser installation path]/logs' directory. The log file name specifies the timestamp and the log type.
- IMPORT - Imports a saved log file from your computer and displays the log. This feature is enabled only when Beanviser is not connected to a target (TV device or emulator).
- HISTORY DATA- Shows reports for data older than one hour. You can choose to view either the overall trend of the historical data or select the interval for which to see the reports. Available from Beanviser v1.5.
- LIVE MONITORING - Shows live reports for the duration of one hour. Available from Beanviser v1.5.
Navigation bar
Use the navigation bar to navigate the chart, zoom into a certain section, and zoom out. The following screenshot shows the navigation bar handles zoomed in from the default position to a certain time frame. Before moving the handles, the graph is showing the data from 05:05:00 to 05:15:00. After moving the handles, the graph is showing the data from 05:09:30 to 05:10:50. In other words, the graph has been zoomed in.

Managing custom views
Views used on Beanviser are made as web app type, and Beanviser allows using custom views. You can add a new view created with a default view template that consists of HTML, JavaScript, and CSS files.
Creating a new view
To create a new view:
- Click the Configuration button
 on the top left corner. As a result, the device list is displayed.
 - Click the Main Menu button
 on the top left corner.
 - Click the Manage Custom Views menu.

- Enter the details (Name, Chart Type, and Tab title) for the view.
- Click the ADD button. Then, the added view is listed on the below table.

- Click the SAVE Button. Once saved, Beanviser is restarted to reflect the change of Tabs UI.
- A dialog requests the answer to restart for reflecting the change of Tabs UI. Click YES.
The newly added view is shown as a new tab. You can customize it with editing files of the corresponding view.
Modifying/Removing view
To modify or remove the added view:
- Click the Configuration button
on the top left corner. As a result, the device list is displayed.
- Click the Main Menu button
on the top left corner.
- Click the Manage Custom Views menu.
- Click the Edit or Remove button.
- If you click the Edit button, you can change the tab title or chart type.
- If you click the Remove button, the selected view is removed from the table.
- Click the SAVE Button. Once saved, Beanviser is restarted to reflect the change of Tabs UI.
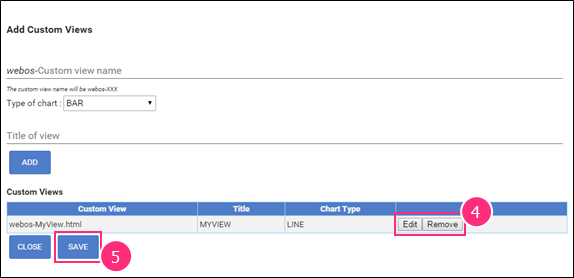
- A dialog requests the answer to restart for reflecting the change of Tabs UI. Click YES.
Customizing view
As above, Beanviser provides a new view with the default template that contains HTML, JavaScirpt, and CSS files. You can find corresponding files of the created view in viewer/elements.
File | Description |
|---|---|
webos-[Specified Name].html | Layout file that contains Control Buttons and chart area. |
webos-[Specified Name].js | Contains source code for drawing chart. |
webos-[Specified Name].css | Style sheet file. |
Moreover, you can customize Beanviser service, a JavaScript Service, that runs on webOS TV and provides monitoring data to the Beanviser. If you customized Beanviser service, you need to repackage the Beanviser service to apply it. See Repackaging Beanviser Service
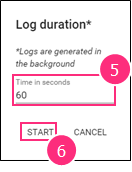
Starting background logging
Beanviser works not only in real-time when Beanviser connected to target but also starts background logging. The target device collects logs for the specified duration time. After background logging, you can get the collected log from the target.
To start background logging:
- Connect Beanviser to the target.
- Click the Configuration button
on the top left corner. As a result, the device list is displayed.
- Click the Main Menu button
on the top left corner.
- Click the Start Logging menu.

- Enter the duration time (seconds) for logging.
- Then, click the START button.
Getting log from target
After background logging, you can get the log file from the target to your local storage ([Beanviser installation path]/logs).
To get the log file from the target:
- Connect Beanviser to the target.
- Click the Configuration button
on the top left corner. As a result, the device list is displayed.
- Click the Main Menu button
on the top left corner.
- Click the Get Log from Target menu.
Then, the Info dialog appears and show you where the log file is.

Repackaging Beanviser service
Beanviser server is a JavaScript service for webOS TV communicated with Beanviser to transfer monitoring data. When Beanviser connects to the target, Beanviser service is installed automatically with a dummy app. If you modified Beanviser service, You should re-package the dummy app and re-install Beanviser service to apply your modification.
To update Beanviser service:
- Connect Beanviser to the target.
- Click the Configuration button
on the top left corner. As a result, the device list is displayed.
- Click the Main Menu button
on the top left corner.
- Click the (Re)Package menu.
Then, Beanviser displays a success message in seconds.

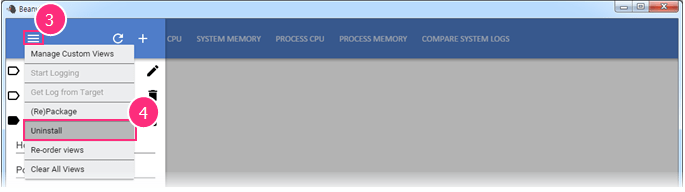
Uninstalling Beanviser service
After you disconnect Beanviser from the target, you can remove Beanviser service from the selected target. See the below steps:
- Select the target to uninstall Beanviser service.
- Click the Configuration button
on the top left corner. As a result, the device list is displayed.
- Click the Main Menu button
on the top left corner.
- Click the Uninstall menu.
Then, Beanviser displays a success message in seconds.
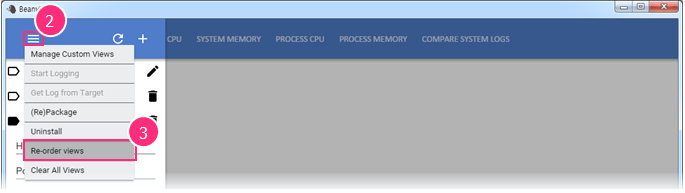
Re-ordering views
You can customize the tab order and tab visibility within the Beanviser UI. To customize the tabs:
- Click the Configuration button
on the top left corner. As a result, the device list is displayed.
- Click the Main Menu button
on the top left corner.
- Select the Favorite Views menu.
 As a result, the favorite view customization table is displayed as shown below.

- To change the visibility of the tabs, use the checkboxes.
- To change the order of the tabs, use the arrow buttons.
Clearing all views
You can clear the charts in all tabs regardless of whether Beanviser is connected to a device or not. To clear all the charts:
- Click the Configuration button
on the top left corner. As a result, the device list is displayed.
- Click the Main Menu button
on the top left corner.
- Select the Clear All Views menu. As a result, the charts on each tab are cleared.
