Setting up Project
We have been decided to no longer support the IDE from 2022. We recommend that you use the VS Code extension instead.
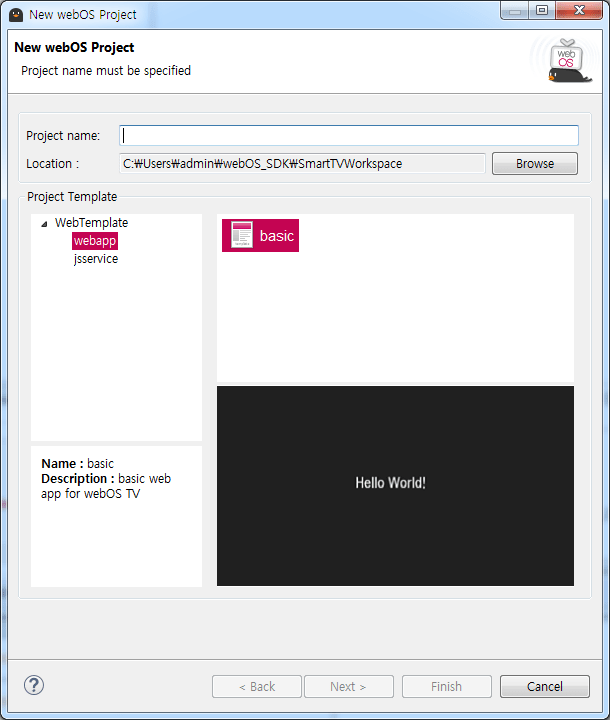
The webOS TV IDE provides project templates for web apps and JS services.
Creating web apps and services from templates
The webOS TV IDE provides the basic web app template and the JS service template that make your web app development easier.
- webapp: The basic web app template
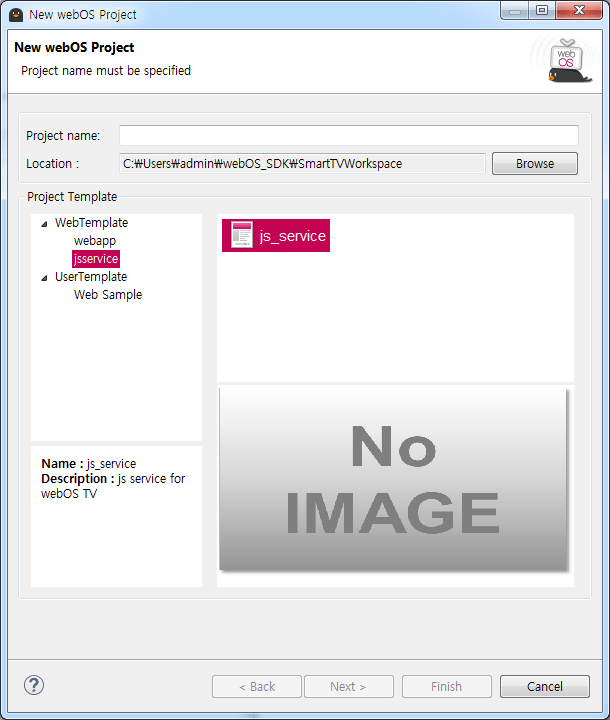
- jsservice: The JS service template
From webOS TV 4.0 SDK, the IDE does not provide Moonstone templates, which include the Moonstone library. To use the Moonstone library, refer to Enyo/Enact Guides.
The following shows how to create web apps using a template:
-
In the IDE, click webOS Menu > New webOS Project from the menu. Alternatively, you can start a new webOS Project using any of the following:
- Click File > New > New webOS Project from the menu.
- Select New > New webOS Project from the right-click menu in the Project Explorer.
- Click New webOS Project from the drop-down menu next to the toolbar icon.
-
Enter a project name and select a template from the Project Templates list.
-
Click the Finish button.
The status bar at the bottom of the New webOS SmartTV Project window shows the app creation progress. If you create the new app project successfully, the Console shows the created app path, and the template package is listed in the Project Explorer. The appinfo.json file of the created project automatically opens in the editor in case you have anything to modify.
Editing appinfo.json file from template
After you create your app project, the webOS TV IDE provides the same configuration file template as the webOS TV CLI provides. The appinfo.json is an essential file for the webOS TV app, which specifies metadata of the web app, such as app ID, name, and other related resources. The following example shows some properties of appinfo.json.
{
  "id": "com.yourdomain.app",
  "version": "0.0.1",
  "vendor": "My Company",
  "type": "web",
  "main": "index.html",
  "title": "Your Project Name",
  "icon": "icon.png",
  "largeIcon": "largeIcon.png"
}
webOS TV uses the appinfo.json file to identify and launch the app. The appinfo.json file can be edited in two ways as below:
- Using the Overview tab, you can edit the mandatory properties with its UI. However, optional properties cannot be added to the Overview tab.
- Using the appinfo.json source tab, you can edit both the mandatory and optional properties.
The webOS TV IDE checks the syntax errors and warnings for the appinfo.json file. It shows red and yellow icons on the source code; those colors mean that the property name or value is incorrect or unsupported; the red icon in the IDE indicates syntax errors, and the yellow icon indicates warnings.
After you edit the appinfo.json file, make sure you save it to apply the changes. For the detailed information on the appinfo.json file, see appinfo.json.
Creating source files in project
You need to implement source files in your project. The following shows how to create a source file:
-
In the IDE, click webOS Menu > New > New Source File from the menu. Alternatively, you can create a source file with the following ways:
- Click File > New > New Source File from the menu.
- Click New Source File from the arrow on the right of the toolbar icon.
-
Select a parent folder that is created in a project.
-
Enter a file name in the File name field and click the Finish button.
Importing webOS project
You can import any web app project which contains the appinfo.json file into the webOS TV IDE. Make sure that the project which has the same name is already created in the webOS TV IDE.
The following shows how to import an existing webOS TV project:
-
In the IDE, click webOS Menu > Import webOS Project from the menu to import a webOS TV project into the IDE. Alternatively, you can import a webOS TV project with the following ways:
- Click File > Import from the menu and select webOS > Import webOS Project on the Import window.
- Select Import from the right-click menu in the Project Explorer and select webOS > Import webOS Project on the Import window.
-
Click the Browse button to select your project folder from the file dialog, then click Open.
-
Select your project type, and check the copy option to import your project.
-
Click Finish to import your project into a folder.
Here are Code Samples, which are provided by LG Developer that can be imported into the webOS TV IDE.
Importing custom templates
The webOS TV IDE provides templates for you to develop web apps easily. However, if you want to use your own templates for web app development, refer to the below steps:
Following shows how to register a new custom template on the UserTemplate folder under the workspace:
-
Click webOS Menu > Register Application as Template from the menu to register the current application project as a template. Alternatively, click the toolbar icon.
-
Click the second Browse button to modify the template location. The
UserTemplatesfolder under the default IDE workspace is used to save the custom templates. -
Enter your template name. Enter the description and register the preview image if needed. Then, click Finish to register a custom template.
-
To check the registered custom templates, click webOS Menu > New webOS Project from the menu. The registered template under the
UserTemplatemenu is newly created, and one of the user's templates is selectable.
To change a location where custom templates are saved, set the Preferences from the Window menu. On the Preferences window, click webOS > User Template in the tree view and change the location with the Browser button.
Creating project for services
The webOS TV SDK provides a service template to help your easy start on developing a service. Before you create your service, you MUST have an app project created in advance.
-
Click webOS Menu > New webOS Project. Alternatively, you can start a new webOS Project using any of the following:
- Click File > New > New webOS Project from the menu.
- Select New > New webOS Project from the right-click menu in the Project Explorer.
- Click New webOS Project from the drop-down menu next to the toolbar icon.
-
On the New webOS Project dialog,
-
Select the jsservice category from the Project Template list.
-
In the Project name field, type in a project name for your service.
-
If desired, change the location of this service project. If not, skip this step.
-
Click the Next button.
-
-
On this new New webOS Project dialog, click the Browse button to select the app project for which the service is developed.

-
On the webOS Project Selection dialog, select an app project to which this service is written for and click the OK button.

-
Once you have set your service name, click the Finish button to proceed. Then a popup shortly appears to show you the status project creation.
-
If you create the new project successfully, the Console would have a set of messages about project generation.