webOS Studio Developer Guide
This guide will explain how you set up and use the webOS Studio extension on VS Code.
Set up
To use the webOS Studio, you have to set up the following.
Select a workspace
Workspace is the root directory for all your webOS apps and services. All commands of webOS Studio will be executed based on the workspace.
Navigate to File > Open Folder and select a directory. This directory will be your a new workspace.

The workspace of webOS Studio is different from that of VS Code, and webOS Studio can only have one workspace at a time, meaning it does not support the multi-root workspaces feature of VS Code.
Install global packages
Global packages are packages that are essential to run webOS Studio. webOS TV extension supports a command to install these packages at once, and it needs to be run once initially.
Step 1: Open the Command Palette (Ctrl + Shift + P).
Step 2: Execute webOS: Install Global Packages.

Or you can also do the same job with the following command:
npm install -g @enact/cli @webos-tools/cli patch-packageSet Device profile
webOS Studio supports multiple webOS platforms. So, you need to set the device profile to tv before starting to use the extension.
By default, the device profile is set to webOS TV.
Step 1: Go to the Command Palette (Ctrl + Shift + P).
Step 2: Execute webOS: Set Device Profile.
Step 3: Select tv.
You can check the current device profile on the bottom-left corner. It should be set as webOS TV.

Configure Package Manager
Select a folder where the Package Manager installs SDK tools. When a user runs the Package Manager for the first time, a pop-up message for selecting a folder will show up. All tools installed through the Package Manager will be installed in this directory.

For more details, see Package Manager.
Prepare and connect a device
Install the Developer Mode app
First, install the Developer Mode app on your TV and turn on Developer Mode. For more information about installing the Developer Mode app, see Developer Mode App.
Step 1: Install the Developer Mode app on your TV from LG Apps.
Step 2: Launch the Developer Mode app from the webOS TV Launcher and log in to the Developer Mode with your LG account.
Step 3: Click the Dev Mode Status button to turn on Developer Mode.
Register the target device
Register your target device information on webOS Studio.
Step 1: Click the + button in the KNOWN DEVICE view. Or open the Command Palette (Ctrl+Shift+P) and select webOS: Set Up Device and then Add Device.

Step 2: Enter your device name, IP address, port number, and user name for the connection.
The device name should not start with "%" or "$".
If you are using a TV device, enter 9922 for port number and prisoner for user name. (These are the default values for tv.)
Step 1: On your TV device, in the Developer Mode app screen, click the Key Server button.
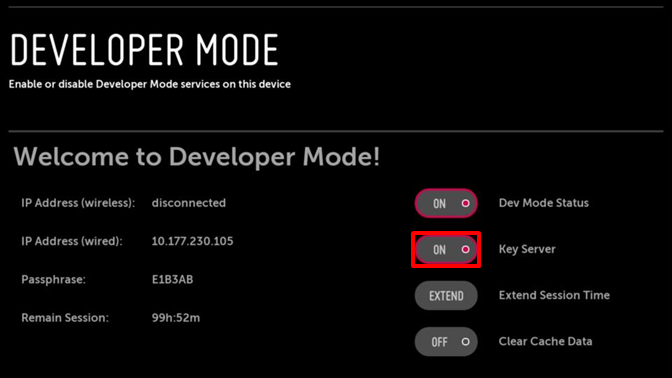
Step 2: on webOS Studio, open the Command Palette (Ctrl+Shift+P) and select webOS TV: Set Up SSH Key from the Command Palette (Ctrl+Shift+P).
Step 3: Select your device and enter the passphrase (case sensitive) as displayed on the Developer Mode app.
You can add more devices by repeating the steps above. To set a certain device, among multiple registered devices, as the default device, right-click the device and select Set Default Device. Actions will be performed on this default device unless the target device is specified.
Basic usage
This section explains a typical development flow of webOS apps and services using this extension.
Create an app or service
Step 1: Click the + button in the APPS IN WORKSPACE view.

Or Execute webOS: Create ProjectWizard in the Command Palette. The Project Wizard window will be displayed on the right side.

Step 2: On the Project Wizard window, select TV at webOS Product and Default at API Version and click Generate Project.
Step 3: Select a template to use and click Next. Here is the list of templates provided.
Template | Description | |
|---|---|---|
Web App | Basic Web App | A basic web app for webOS |
Web App | Hosted Web App | A hosted web app |
Web App | Web App Info | Configuration file for a web app (appinfo.json). See appinfo.json. |
JS Service | JS Service | A JavaScript service for webOS. This service MUST be packaged and installed with an app. |
JS Service | JS Service Info | Configuration files for a JS service (services.json and package.json). See services.json. |
Enact App | Sandstone | Enact apps with the Sandstone library. For more information, visit the Enact website. |
Enact App | Moonstone | Enact apps with the Moonstone library. For more information, visit the Enact website. |
For JS services and Enact apps, you can add webos-service library for using webOS components. To use the library in your service or app, check Yes at the Add webOS library option. Or you can later do that by right-clicking the app or service in the APPS IN WORKSPACE view and selecting Install webOS NPM Library.
Step 4: Enter your project information, such as Project Location, Project Name, and App or Service ID, and click Finish. Necessary information items vary upon the selected template.
Import an app or service
Step 1: Click the ↓ button in the APPS IN WORKSPACE view.

Step 2: Select the folder of the app or service to import. The app or service will be added to the list.
Edit the source code
Implement your own features on the created apps or services.
Write with Auto-Completion
webOS Studio provides a powerful content-assist feature called Auto-Completion. Auto-completion includes API suggestions and automatically completes method names, helping users implement webOS features more easily.
For more details about the auto-completion feature, see Auto-Completion.

Preview with Auto-Reloading
While editing an app, you can preview the app UI before installing it.
To preview the app, in the APPS IN WORKSPACE view, right-click the app and select Preview App. The preview of the app is automatically launched on the right side.

You can check the result of your modification to the source code instantly in this preview.
Package, install, and launch the app
A typical process to install webOS apps is in three steps:
Step 1: Package the source code into an .ipk file.
Step 2: Install the IPK file.
Step 3: Launch the installed app.
You can trigger these steps in sequence by clicking the Run App button in the APPS IN WORKSPACE view. After clicking the button, enter the information about the app to run. If you use the default information, just press the Enter key.

Or you can do package, install, and launch the app separately in several other ways.
• In the APPS IN WORKSPACE view, right-click the app and select the operation you want.

• Open the Command Palette (Ctrl+Shift+P) and type the operation you want.

• In the Explorer of VS Code, right-click the app folder and select the operation you want.

A JavaScript service is always packaged with an app. If you want to install a JavaScript service, select the service in the Service directory to pack with App step.
Launch the app with parameters
You can run an app on the target device with launch parameters. To run the app with launch parameters, open the Command Palette (Ctrl+Shift+P) and select webOS: Launch Application with Parameters. For more about launching with parameters, see ares-launch.
Run the app on a Simulator
You can run an app on the Simulator without packaging and installing it. To run the app on a Simulator,
Right-click the app to run in the APPS IN WORKSPACE view and select webOS TV: Run on Simulator,
Right-click the simulator to use in the Simulator Manager view and select Run App, or
Select webOS TV: Run on Simulator from the Command Palette (Ctrl+Shift+P).

You can also run the app with launch parameters on a Simulator by selecting webOS TV: Run on Simulator with Parameters from the Command Palette (Ctrl+Shift+P).
If you have not installed webOS TV Simulator yet, install the Simulator first using Package Manager.
Uninstall the app
You can uninstall apps in the KNOWN DEVICE view.
To uninstall an app from a certain device, right-click the app in the Installed app list of the device and select Uninstall.
Debug the app
You can debug apps or services that are installed on the known devices. Supported types are as follows:
Web app
Enact app
JavaScript service
Depending on the webOS TV platform version, you may not be able to use the debugging sessions explained below. In such cases, you can still use Inspectors for debugging. See FAQ on debugging for more details.
Prerequisites
The target device or Emulator should be running as Default Device.
(For debugging with Chrome Inspector) A Chromium-based browser is installed. See Launch Web Inspector for more details.
Start a Debugging Session - App
Step 1: In the APPS IN WORKSPACE view, right-click an app and select Debug on.

Step 2: Select Chrome Inspector or VS Code Debugger.
• Chrome Inspector Enter the path of the browser executable.

Then the debugging session will be activated in the browser.

• VS Code Debugger The DEBUG CONSOLE panel will be activated automatically. In the panel, you can check the console messages from the app or service.

In the debugging session, you can set breakpoints, check variables, callstack, etc.
Start a Debugging Session - Service
Step 1: In the APPS IN WORKSPACE view, right-click an installed service and select Debug on.
Step 2: Select Chrome Inspector or VS Code Debugger.
• Chrome Inspector a. A URL for the debugging session will be displayed in the OUTPUT panel. Copy the URL.

b. Open your browser and go to chrome://inspect. Configure the URL as follows:

Microsoft Edge browser automatically redirects chrome://inspect to edge://inspect.
c. Click inspect.

This opens a new window for the debugging session.

• VS Code Debugger The DEBUG CONSOLE panel will be activated automatically.

Every time you restart a debug session, the packaged app will be closed on the target device. If you want to check the behavior of the app, relaunch the app manually.
Run ESLint on the Enact App
ESLint statically analyzes files for potential errors (or warnings) and helps enforce a common coding style. For more information, check ESLint Configurations.
To run ESLint, in the APPS IN WORKSPACE view, right-click a React app and select Run Lint. The PROBLEMS panel shows the result messages.

To clean the Lint messages from the panel, in the APPS IN WORKSPACE view, right-click the React app and select Clear Lint.
Useful features
Auto-Completion
Auto-completion assists you in using LS2 APIs. It suggests services and guides you in completing methods and parameters.
More specifically, it does the following:
Auto-completing API strings using the Tab key
Providing a list of available LS2 APIs (services, methods, and parameters)
Providing descriptions for each LS2 API
Providing links to API documentation webpages
You can trigger suggestion by typing one of the trigger strings, luna:// or new LS2Request.
• Type luna://
Item | Trigger string |
|---|---|
Service | luna:// |
Method | Enter the / right after luna:// |
Parameter | Press Ctrl + Space after luna:/// |

• Type new LS2Request
This is to use Enact webos LibraryES.
Type new LS2Request, and press Ctrl + Space to trigger suggestions. Use Tab to the next item.

Package Manager
In order to launch the Package Manager on Windows, VS Code has to be opened with the administrator permission. On Mac and Ubuntu, the system prompts you for the root user password during component installation.
Package Manager helps manage SDKs for webOS app development with convenience. You can install and uninstall SDKs with a simple click.

Every time webOS Studio extension (or VS Code) launches), the Package Manager automatically updates the package list. It checks if newer versions of SDKs exist, and if they do, the list will be updated automatically.
• When a user runs the Package Manager for the first time, a pop-up message for selecting a directory will show up. Once the directory is set, all SDKs are installed in this directory.
• Some SDKs require prerequisite software, so the Package Manager checks if the software is installed. If not installed, it will download, extract, and install the software.The following table lists software prerequisites for each SDK.
SDK | Prerequisite |
|---|---|
webOS TV Emulator | Python: 3.6 or higher |
webOS TV Emulator | Virtualbox: 6.1 |
webOS TV Emulator | Emualator Launcher: 0.9.4 or higher |
Simulator Manager
You can find the list of installed Simulators in the SIMULATOR MANAGER view. Right-click the Simulator to use and select Run App to run your app.

Emulator Manager
You can find the list of installed Emulators in the EMULATOR MANAGER view. Click the Launch button on the right of the Emulator to launch.

From webOS TV 22, Emulator will not be provided. We recommend that you use the webOS TV Simulator instead.
If you are using webOS Studio v2.0.2 or lower, you need to install Emulator Launcher, a command-line based tool which helps users set up webOS Emulators, to use Emulator Manager.
To install the Emulator Launcher,
Open the Command Palette (Ctrl + Shift + P) and type webOS: Install Emulator Launcher, or
Execute the following the command. (If you are using Windows, use python instead of python3.)
python3 -m pip install --upgrade webos-emulator --force-reinstall
IPK Analyzer
You can analyze the file size of the app or services in the IPK file.
Step 1: Open the Command Palette (Ctrl + Shift + P) and type webOS: IPK Analyzer.
Step 2: Choose the IPK file to analyze. After the file is loaded, you can see the following screen:

Step 3: Click the Browse button on the right section to load another IPK - for example, its older version.

Process log
webOS Studio has many internal utility commands including ares-cli, enact-cli, and VirtualBox utility. In the OUTPUT panel, you can check the output logs of these commands and find helpful information to debug your apps or services.
