Emulator Introduction
From webOS TV 22, Emulator will not be provided. Instead, we provide Simulator with better development convenience. If you still need to use the Emulator for webOS TV 6.0 or lower, you can install it using webOS Studio | Packager Manager.
webOS TV Emulator emulates webOS TV on your computer, enabling you to test and debug apps on your computer. It runs on the Oracle VM VirtualBox to emulate webOS TV and emulates LG Smart+ TV remote control unit.
Supported platform version
The supported platform version for each emulator is as below.
Emulator version | Supported webOS TV Version | Release Year of webOS TV |
|---|---|---|
6.0.0 | webOS TV 6.x | 2021 |
5.0.0 | webOS TV 5.x | 2020 |
4.0.0 | webOS TV 4.x | 2018, 2019 |
3.0.0 | webOS TV 3.x | 2016, 2017 |
2.0.0 | webOS TV 2.x | 2015 |
1.2.0 | webOS TV 1.x | 2014 |
Starting and exiting emulator
Starting the emulator activates the virtual machine and launches the main screen. Then, the remote control unit is launched.
Starting the emulator
Windows: Select the shortcut menu in Start > webOS TV SDK or click the shortcut icon on Desktop.
Mac OS: Select Finder > Favorites > Applications > webOS_TV_SDK and double-click the shortcut icon.
Linux: Search the emulator by keyword "webOS" in Dash home and click the shortcut icon.
We recommend for you to reboot your PC after installing the emulator on macOS or Linux.
Exiting the emulator
Step 1: Press ![]() in the remote control unit emulator or click MENU and select Exit.
in the remote control unit emulator or click MENU and select Exit.
Step 2: When the confirmation popup window appears, click OK.
Getting familiar with emulator UI
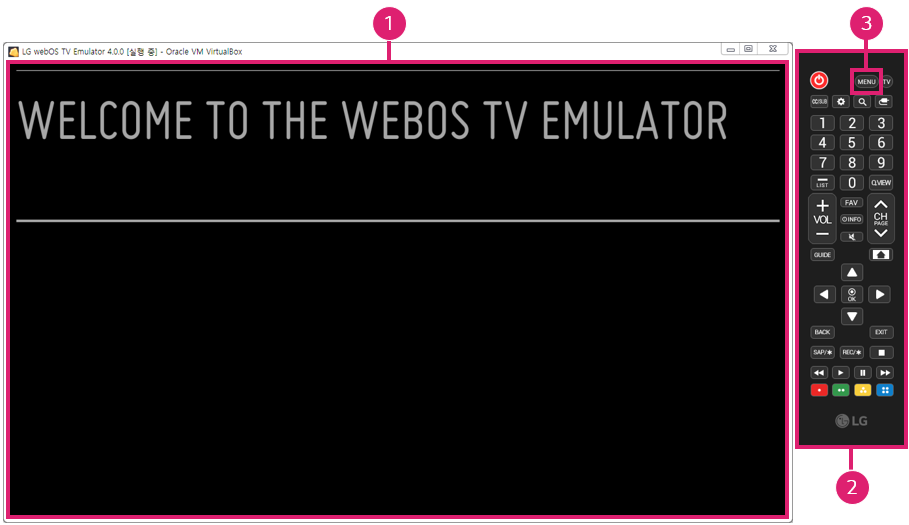
The following screenshot shows the webOS TV emulator launched on the computer.
Item | Name | Description |
|---|---|---|
① | Main Window | Displays emulator actions. It is in part of VirtualBox and has the same resolution as the LG Smart TV screen (1920 x 1080 Full HD). It can be resized or changed to full-screen mode. |
② | Remote Control Unit Emulator | Emulates the remote control unit. |
③ | Emulator Menu | Provides main functions. Click MENU, then sub-menus appear: App Manager, Take Screenshot, Help, About, and Exit. |
User input & preloaded apps
The user inputs of the webOS TV emulator are similar to those of the webOS TV, using an HID keyboard, a mouse, and a remote control unit emulator.
• Use a mouse to scroll up and down the page and navigate with the cursor.
• Use an HID keyboard to enter text in an app.
• The following keys are supported in the remote control unit emulator.
Power, Home, Back, OK, Left, Right, Volume, Mute
• Press the Home key in remote control unit emulator for starting and exiting Home UI.
• Press the Command key on macOS, the Windows key on Windows, and the Super key on Linux for starting and exiting Home UI.
This figure shows the Home UI containing preloaded apps in webOS TV emulator v6.0.0.

Welcome: An app showing the welcome message
Enact Hello: Enact-based web app that shows the 'HELLO WORLD!" message
Enact Sampler: A comprehensive tour of Enact and its libraries
APIs supported on the emulator
To see which APIs are supported on each emulator version, go to API and check each section.
Emulator limitations and differences
The following describes what limitations the webOS TV emulator has compared to webOS TV.
The webOS TV platform UI is limitedly supported: launching/exiting Home UI is supported only.
The TV tuner is not supported.
Magic remote control is limitedly supported. The acceleration sensor is not supported.
Supported codecs and containers are listed in Streaming Protocol and DRM.
LG Apps is not supported.
Multi-sound works with multiple audio elements in the emulator. However, in real TV, you can only use one audio element in an app. See Multi-sound Playback for details.
The keycodes for media playback keys on a conventional remote control unit are not correctly mapped on webOS TV Emulator 6.0. If needing to use those keycodes, use webOS TV Emulator 5.0 instead. See Media playback keys for the correct keycodes.
There may be a difference in performance between webOS TV and Emulator. The performance depends on the CPU speed, the graphics card, and the video memory of your computer.